
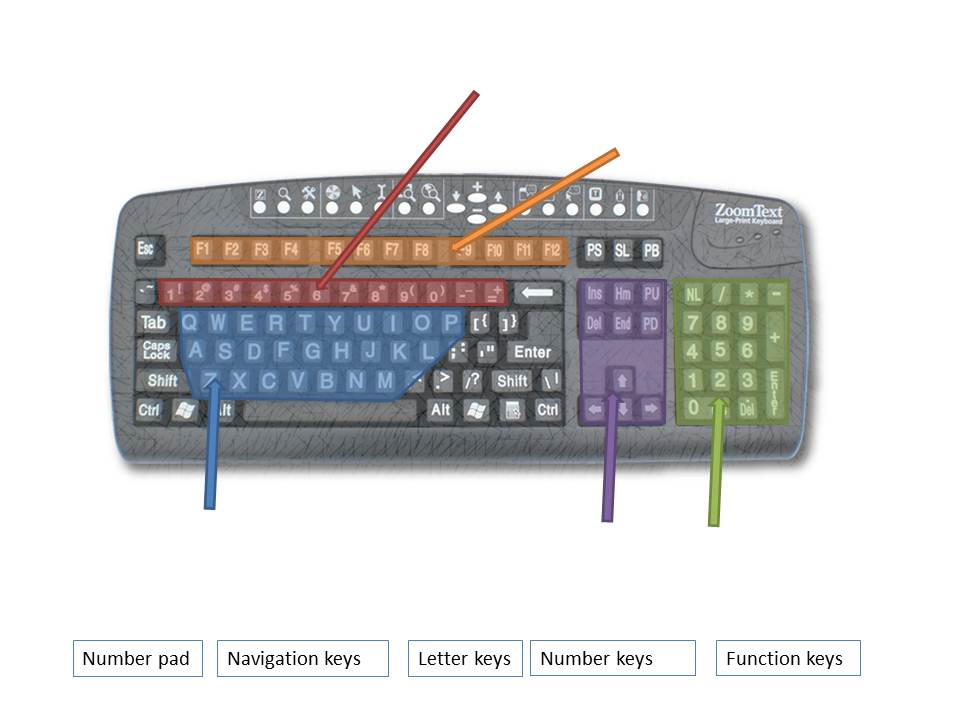
The keyboard is a device designed to allow a user to ‘input’ information into a computer by pressing buttons. It is a device with lots of buttons (or keys). The keys are grouped to make it easier to use the keyboard. The groupings of the keys are shown below:
The letter keys are grouped, and are usually presented in the ‘QWERTY’ format (shown in blue in the picture). Some special keyboards may have the keys in alphabetical order. The long bar below them is called the space bar, which adds a space between typed words.
Some keyboards have a number pad to the right (shown the picture in green) which contains the numbers and + - x and ÷. This allows for fast number work. Some keyboards do not have a number pad in order to make the keyboard more compact. This is common on laptops or portable keyboards. All keyboards however have the numbers above the letters (shown in the picture in red). There are a set of navigation keys in the centre of the keyboard (shown in the picture in purple), consisting of arrow keys, home and end, page up and page down, insert and delete.
The key groupings on a keyboard
You can download a printable labelling exercise for this here: exercise_-_keyboard_diagram
On the keyboard there are also a number of special keys. These are as follows:
 Shift: (This key often has an upward pointing arrow on it and there is usually
one on each side of the keyboard.) When this key is held as another key is
pressed, it changes the use of that key. When used with a letter key it will change
the case of the letter (a becomes A, b becomes B etc.). When used with one of
the keys with lower and upper options (e.g. ‘{‘ or ‘[‘ ) the upper option will
be displayed when holding shift.
Shift: (This key often has an upward pointing arrow on it and there is usually
one on each side of the keyboard.) When this key is held as another key is
pressed, it changes the use of that key. When used with a letter key it will change
the case of the letter (a becomes A, b becomes B etc.). When used with one of
the keys with lower and upper options (e.g. ‘{‘ or ‘[‘ ) the upper option will
be displayed when holding shift.
 Control: (ctrl) This key performs special operations when pressed in
conjunction with other keys. The ctrl key allows many useful shortcuts to be
performed. Some of the most commonly used are:
Control: (ctrl) This key performs special operations when pressed in
conjunction with other keys. The ctrl key allows many useful shortcuts to be
performed. Some of the most commonly used are:
There are many others (see the page on Keyboard Shortcuts) and the functionality often changes dependent on the program that is being used at the time.
 Alt: This is a key used to ‘alternate’ the function of the key. Like
SHIFT and CTRL, it is held whist pressing other keys to change what they do. The
functions performed by the alt key combinations vary depending on the program
being used. Commonly they will allow shortcut (or non-mouse-user access) to
menus.
Alt: This is a key used to ‘alternate’ the function of the key. Like
SHIFT and CTRL, it is held whist pressing other keys to change what they do. The
functions performed by the alt key combinations vary depending on the program
being used. Commonly they will allow shortcut (or non-mouse-user access) to
menus.
 Caps Lock: This key is a way to use shift without holding it down. Press
it once and the case of all characters typed will switch. Press it again to
switch the case back again. There is often a light on the keyboard which
denotes whether or not the caps lock is on. Caps lock can also be used to
capitalise letters when a user finds it hard to use both hands.
Caps Lock: This key is a way to use shift without holding it down. Press
it once and the case of all characters typed will switch. Press it again to
switch the case back again. There is often a light on the keyboard which
denotes whether or not the caps lock is on. Caps lock can also be used to
capitalise letters when a user finds it hard to use both hands.
 Windows:
The Windows key is a shortcut to the ‘Start
menu’ or a means of accessing the menus without using a mouse. It also allows a
number of shortcuts relating to the movement and maximising/minimising of
windows. Some of these shortcuts are listed in Section 0 ‘Using the Computer’
Windows:
The Windows key is a shortcut to the ‘Start
menu’ or a means of accessing the menus without using a mouse. It also allows a
number of shortcuts relating to the movement and maximising/minimising of
windows. Some of these shortcuts are listed in Section 0 ‘Using the Computer’
 Tab: Usually denoted by an arrow pointing to the right with a vertical line
at the end. The tab key has several uses:
Tab: Usually denoted by an arrow pointing to the right with a vertical line
at the end. The tab key has several uses:
 Enter (or return): There are two enter (sometimes
called return, or carriage return) keys. There is one to the right of the
letter group, often marked with an arrow pointing down and to the left. There
is also one on the bottom right hand side of the number pad – usually marked
‘enter’. Both keys generally perform the same function, which is usually to
finish an entry and perform a process. It is often the keyboard equivalent of
clicking an OK button with the mouse. When using a word processing package, the
enter key will act as a carriage return – beginning a new paragraph.
Enter (or return): There are two enter (sometimes
called return, or carriage return) keys. There is one to the right of the
letter group, often marked with an arrow pointing down and to the left. There
is also one on the bottom right hand side of the number pad – usually marked
‘enter’. Both keys generally perform the same function, which is usually to
finish an entry and perform a process. It is often the keyboard equivalent of
clicking an OK button with the mouse. When using a word processing package, the
enter key will act as a carriage return – beginning a new paragraph.
 Backspace: (often marked with an arrow pointing to the left) The backspace key
allows a user to delete the last character they typed. Holding the backspace
key will repeatedly delete characters.
Backspace: (often marked with an arrow pointing to the left) The backspace key
allows a user to delete the last character they typed. Holding the backspace
key will repeatedly delete characters.
 Delete: The delete key (sometimes marked ‘del’) serves to delete the
character in front of the curser point. It can also be used for such tasks as
deleting pictures from documents,
Delete: The delete key (sometimes marked ‘del’) serves to delete the
character in front of the curser point. It can also be used for such tasks as
deleting pictures from documents, or deleting a file from a folder.
 Escape: (sometimes labelled ‘esc’) the escape key is a shortcut for
exiting or ending programs. It is often the keyboard version of pressing an
exit, no, quit or cancel button. It is also used as a keyboard shortcut for the
stop button in many html browsers.
Escape: (sometimes labelled ‘esc’) the escape key is a shortcut for
exiting or ending programs. It is often the keyboard version of pressing an
exit, no, quit or cancel button. It is also used as a keyboard shortcut for the
stop button in many html browsers.
There are also twelve function keys across the top of a standard keyboard, which allow the user to perform shortcuts to functions (these are shown in orange in Figure 34). An example of this in windows is the F1 button which typically calls up the help system for the current application.
A number of more accessible keyboard options are available, including large text, large keys, high contrast, colour coded keyboards and simplified keyboards.
In Windows XP the way the keyboard works can be changed to suit particular users. The changes can be made using the ‘accessibility wizard’ available from ‘start menu / All Programs/ Accessories/ Accessibility’.
In Windows 7, these changes can be made using the ‘Ease of Access Centre’ which is located under ‘start menu/All Programs/accessories/Ease of Access/Make the keyboard easier to use’ or by pressing the Windows Key + U together and then selecting ‘Make the keyboard easier to use’.

A screen capture of the Windows 7 on-screen keyboard
Keyboard Navigation - In Windows applications pressing 'F10' will bring up a number of shortcuts on the 'ribbon' along the top of Microsoft applications. The shortcuts displayed can then be typed to access the various functions of the ribbon. The two images belos show this in action in Microsoft Outlook. Pressing F10 shows the shortcust in the first image to jump between tabs. The in the second image, V has been pressed to access the View tab, and the shortcuts within there are also displayed. It is a useful way to access all features of the ribbon using just the keyboard.


Scanning Keyboards - A scanning on-screen keyboard can be used with a switch controller to allow users with limited physical movement to be able to type accurately onto a computer. Scanning keyboards such as the Windows 7 On-screen Keyboard, and the ‘Tecla’ scanning keyboard for Android, operate by means of scanning through the keys. First the keyboard scans down highlighting each row at a predetermined interval (approximately 1s). The user hits the switch when the row containing the character they want is highlighted. The software then scans along the row highlighting each key in turn. The user hits the switch to trigger the key they want.
More info on Tecla for Android.
Speech Recognition – From the release of Windows Vista, speech recognition has been built into Windows and allows a user to control the machine, and to type using voice (speech-to-text or STT). Some of the more recent smart phones have similar tools inbuilt to allow voice commands and dictation or quick internet searching by means of voice (For example Siri on iPhone and Evi on Android). Speech recognition requires a microphone, and can be found from ‘start menu/Control Panel/Ease of Access/Speech Recognition’ in Windows 7. It is not available by default with Windows XP.
For more information on Accessibility you can check out the Microsoft Accessibility pages.
In an open notepad window:
You could now try: